How to Create the Most Efficient Kitchen Layout
Designing an efficient kitchen space is phase two of my kitchen reno. Read more below and learn how to optimize your kitchen with the 4 cooking zones for simpler cooking.
Last week I shared news about our big house project! As I mentioned then, the biggest decision has been selecting the design-build firm we’ve been working with for the last 4 months (more about that process here).
The next biggest decision has been figuring out the kitchen layout and cabinetry dimensions. As someone who loves spending time in the kitchen and organizing spaces, I had a great time thinking through this part of the project.
Even though this will be a brand new kitchen, it still won’t be a very large kitchen.
However, I’ve always believed that a bigger kitchen isn’t a better kitchen. It’s all about optimizing the space you have.
Even if you’re not going to be doing a kitchen reno anytime soon, I bet you there are lots of things you can do to optimize your current kitchen space. Below are all the questions and considerations I made to determine the best kitchen layout and dimensions for the cabinets.
If you’ve gone through a complete kitchen renovation, please do share your tips and experience in the comments below!

Step #1: Decide on Appliances + Sink
Since I’m starting from scratch with a new kitchen, I got to decide on all new large appliances (dishwasher, fridge, rangetop, oven and microwave oven) and my sink. Knowing the specifications and dimensions of these would determine where to locate them and then how to build cabinetry around it.
I’m not going to get into the whole appliance decision making process since everyone has different budgets and needs. However, I definitely knew that I wanted a gas rangetop and not a cooktop or range (differences explained here). My reasoning for this:
- You can get a more powerful rangetop than a cooktop.
- I knew I wanted my heat source to be built into the island, and I also wanted my pots, pans, cooking tools (e.g., wooden spoons, tongs) and pantry essentials (e.g., oils, vinegars) to be easily accessible within the island. If I chose a range, which comes with an oven, I wouldn’t have the storage space below the stove for all those items.
Step #2: Decide on Appliance + Sink Layout
If you’re working with a larger kitchen, you’ll have a lot more options for how to situate your appliances. In the case of our small kitchen, there weren’t too many variations, which is just fine by me.
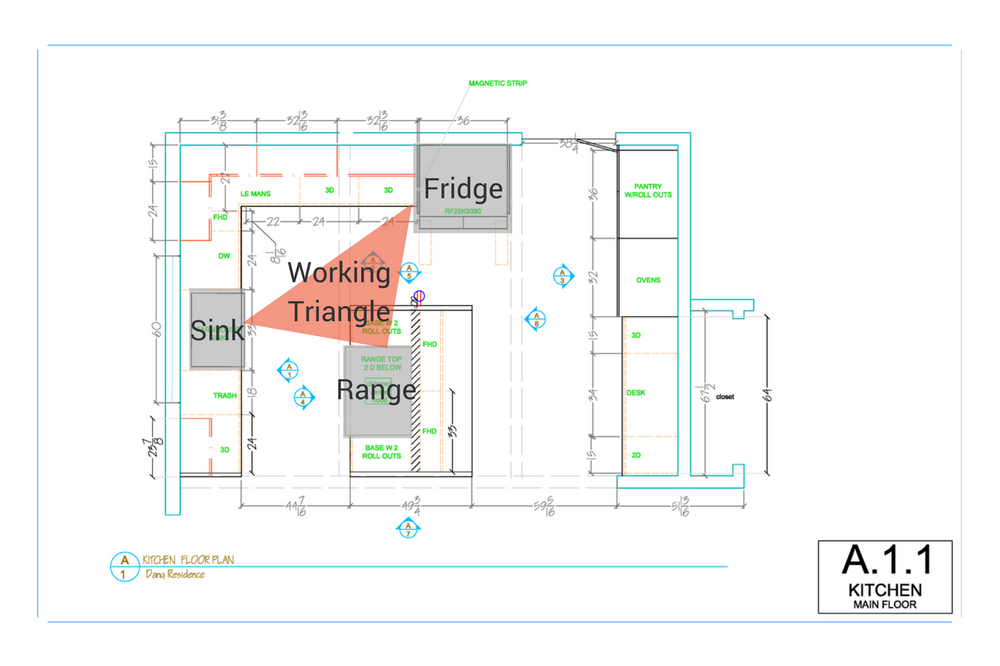
However, whether you’re working with a large or small footprint, it’s best to keep your sink / dishwasher, rangetop and fridge close together. These three points are typically referred to as your “working triangle” because most of your kitchen activity will take place within this triangle. It’s also very helpful to have as much open countertop space within this area for lots of room to prep and place things.
Here’s the kitchen layout that my designers and I settled on:

Step #3: Create Zones Around Your Appliances + Sink
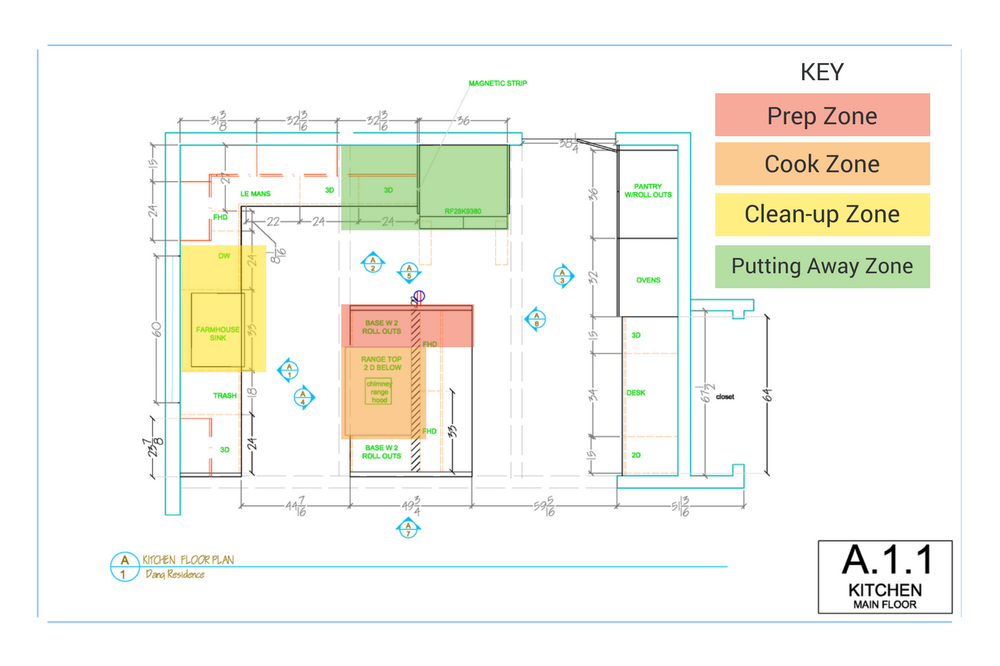
Once you have your appliances laid out, you’ll want to create these 4 zones around your appliances + sink:
- Prepping
- Cooking
- Clean-up
- Putting away
Prepping Zone:
This is where your kitchen workflow typically starts. Most of the time, the prep process looks like this:
- Gather ingredients from fridge and pantry / cabinet
- Rinse in your sink if they need washing
- Get out your prep tools
- Chop and measure out ingredients
Do you have a prep zone? If not, you can easily create one! Here’s what I recommend:
- Designate a place to prep that’s near your cooking zone (i.e., your range). That way, you don’t have to move things far when it comes time to cook. My plan is to have my prep zone right next to my rangetop.
- Keep your prep tools near this space. For me this includes: prep bowls, sheet pans*, baking pans*, salad spinner / colander, knives, peelers, can opener, measuring cups, spoons, cutting board, kitchen towels (tip: place a folded kitchen towel underneath your cutting board to keep it from slipping).
- Keep your most used prepping pantry essentials near this space. For me this includes items that would go into making a dressing or marinade: vinegars, sauces (like soy, fish, worcestershire), oils, spices, salts and sweeteners.
*I know a lot of people put their sheet pans and baking pans near their oven. If you can, it’s more convenient to actually put them near your prep zone because most of the time you’ll prep items and put them right onto a sheet pan or baking pan and then move it to the oven. You’re probably saving yourself just a few feet of walking but something to think about!
Cooking Zone:
After you’re done prepping your ingredients, you’ll move them into the cooking zone. This area typically is where your range and oven are. If you’ve situated your prep zone right by your cooking zone, you won’t have to move things far.
Here’s what I recommend for creating an efficient cooking zone:
- Keep cookware near your range. As I mentioned above, I opted for a rangetop over a range because I thought it was much more convenient to have drawers for pots and pans underneath my range than an oven. If you have a range, just try to put your pots and pans in the closest lower cabinet.
- Keep cooking tools near this space. For me this includes wooden spoons and tongs.
- Keep your most used cooking / seasoning pantry essentials near this space. For me this includes cooking fat(s), salt and pepper.
A little note about my oven placement: Because I chose this GE oven with French doors, there needed to be more clearance on both sides of the oven for the doors to fully open. Because of this, we couldn’t situate it next to the fridge, so our oven isn’t within the “working triangle.” That’s totally fine, since the walk to the oven is like 5 feet (small kitchen, remember?). However, regardless of where your oven is located, make sure there is some sort of countertop space near it. That way your hot, bubbly lasagna doesn’t have to travel far.
Clean-up Zone:
Your sink and dishwasher make up this zone. Ideally it’s close to your prepping and cooking zone because you can easily clean-up as you prep and cook.
Here are my tips to make sure this zone isn’t a disaster:
- Stack up your prep bowls / items as you use them. Transfer them to the sink or straight to the dishwasher. Items that have been used to store raw veggies just need a quick rinse and don’t require room in your dishwasher.
- If your cooking zone is near your washing zone, you can easily do a few dishes while you’re waiting on things, like oil to heat up or a soup to boil. Another reason why a smaller (or well laid out) kitchen can be better!
Putting Away Zone:
This zone is where the post-eating action happens. Ideally, you situate this zone next to your fridge.
To create your putting away zone, make sure these items are near your fridge:
- Tupperware and plastic / foil wrap to store all your yummy leftovers
- Masking tape and Sharpie to label things
- A magnetic white board for your fridge – Despite my love for organization, I’ve never quite been able to wrangle the contents of my fridge and freezer, so I keep an inventory of what’s in there with these magnetic white boards.
Here are the zones we created based on our layout:

Step #4: Determine Cabinet Dimensions Based on Zones
Once I knew where my appliances and zones would be located, I then had to decide on the dimensions of my cabinets / drawers – mainly width and height (as depth is usually fixed). This is definitely where my extreme love for detail and numbers kicked into high gear.
Most people would take the standard suggestions of their designers, but since I knew exactly what I wanted to put in each zone, I made a list of what needed to go into each drawer or cabinet to determine the ideal width and height.
For instance, I knew that I didn’t want to keep my oils out on the island near the rangetop but I still wanted them within arm’s reach in my prepping / cooking zone. I measured the tallest bottle of oil I use, which determined the height of the pull-out shelf to the right of the rangetop. Originally, this storage unit was going to be a cabinet with shelves but since it was going to house pantry essentials, a cabinet with pullout shelves would be much more useful for easy access.
I also then just inventoried everything in my kitchen currently and then “transferred” them to their new homes using this spreadsheet. This helped me think through whether I wanted something to be a cabinet or drawer, if it needed to have regular or pull-out shelves or drawer partitions and also the best dimensions based on the contents of each storage unit.
My designers told me that they had never met anyone who went into the crazy detail that I did. I decided to take that as a compliment, 😉 .
So those are the 4 steps I took to get to the most efficient kitchen layout for this space. All together, it took about 2 months of appliance research and going back and forth with the designers to get all of it finalized.
I figure if I was going to get a custom kitchen, it was worth doing this extra bit of homework. Plus, when everything is done, it’ll be super straightforward to move everything into its new designated space. Counting down the days till we get to that step!
Again, if you’ve gone through a similar process, please do share your tips and experience in the comments below!
Want to keep up with the progress of my kitchen renovation? Make sure to sign up for the newsletter below, and you’ll be the first to know! We’ll also send you our best cooking tips and resources to help you cook smarter, healthier, and happier in the kitchen.
